Sunday, December 29, 2013

Making Bath Salts.... the ones for your bath, NOT the other kind

Anytime I mention I'm making bath salts, I get a lot of jokes about the other kind of bath salts.  So, maybe I should come up with a cool new name like Super Salt Soaker, or Scented Salty Water Softener... or perhaps I should just call it 'Awesomeness!'  (Or, just stop mentioning it in front of certain people!)

Whatever you want to call them, I think they are just great, and super easy to make.  They take mere minutes to throw together and the hardest part is gathering supplies.  Since, as I've mentioned previously, I hoard craft supplies, I have enough ingredients to make about 20lbs worth with about 100 different scents.

Some people only have showers, and some people don't use their tubs, and I think that is such a shame.  If I'm ever having a bad day, or just want to relax with a good book, or a good movie or tv show.... I hit the tub!  Yes, I am one of those 'crazy' people who will drag their laptop into the bathroom, and watch tv and movies on it. Years ago I think I spent over 4 hours in the tub because I got caught up watching a season of 'LOST'... the key is when the water cools you drain some out, and refill a little with more hot water. ;-)  I also love to light candles, add scented bath salts to the water, turn the lights off and soak!  It's such a non-guilty pleasure that more people should embrace! Perhaps, I've shared too much, but I do love a good soak!

For my own use I usually just grab a bowl or jar, throw in some epsom, some dead sea salts, regular sea salts, celtic sea salts, any combination of what is in the front of my craft cabinet, add a few drops of Jojoba oil, sweet almond oil or my new go-to Avocado oil, then add a few drops of essential oil or a scented blend.  Mix with a spoon and Voila!

When I'm making a gift for other people however, I put a bit more effort into it.  For todays blog, I was working in the middle of the night and just wanted to throw something together quickly.  I made a mess, couldn't find a few things, made some last minute substitutions, and never got the finished shot of the jars... well, maybe I'll add it later in better lighting. 

THE LAZY DIVA'S LAVENDER AND EUCALYPTUS 
SUPER SALT SOAKER RECIPE


Ingredients:  
Yes, I made a last minute scent change...
I decided to go with the tried and true Lavender Eucalyptus instead and didn't retake the photo.
Epsom Salts
Sea Salts (Regular, Dead, Celtic or whatever else), 
Oil (Sweet Almond, Avocado, Jojoba, Apricot, or etc..) 
Lavender Essential Oil, 
Eucalyptus Essential Oil, 
dried Lavender and dried Eucalyptus leaves (optional), 
Purple and green coloring (I usually use soap making or cosmetic coloring, but this too is optional).

You'll also need a pint jar to put them in, and two gallon size plastic ziploc (or whatever brand) bags.  

 1)  ADD SALTS

Take your plastic bags and put 1 cup of Epsom Salts and 1 cup of Sea Salts in each bag. I did a double batch here, so I filled two pint jars up with salt, then added them to the bags to make sure they were packed tight.

2) ADD HERBS (Optional)

In bag one add lavender and shake it up.  In bag two add Eucalyptus, and shake it up.  I went really light with the herbs this batch since they can be a little messy in the tub.

3) ADD MOISTURIZING OIL (Optional)

I like to add about a tsp of oil to each bag, for moisturizing, but it's best to do it gradually. Add a couple of drops to each bag, close the bags, shake and work them up good, add a few more drops, shake them up good, and repeat once or twice more.   This batch I used Avocado..since it was handy.

4) ADD ESSENTIAL OILS
In bag one add a few drops of lavender, shake it up, and repeat.  In bag two add a few drops of Eucalyptus, shake it up, and repeat.

5) ADD COLOR
I used a more natural sea salt blend that had a slight pink hue,
which would have been great for the peppermint I planned,
but for the Lavender, I think I added a bit more color than usual.


For a decorative look, I gradually add purple to bag one, and green to bag two, and like above, shake and repeat.  I went through a big melt and pour soap making stage so I have a bunch of soap colors, just keep adding until you get the color you want. 


6) LET DRY FOR A BIT
This picture shows the color a little more accurately. 

Sometimes pressure builds up, so you want to let it dry out a bit to make sure there isn't an issue.

7) ADD SALT TO JARS

I tried to even out the layers with a spoon.
Now for some decorative fun...I usually do layers.  I snip off one of the bottom corners on each bag, or fold over the top and just alternate adding salt to the jar.
Okay... some of my lines were a bit wavy but not too bad!


8) DECORATE THE JAR

When making a gift I usually use the canning jars and put a square of fabric between the lid and the jar.  You can either cut your own fabric, or if you are scissor challenged and lazy like I am.... I buy the pre-cut squares as I've mentioned in previous blogs.  You can also add a label, and/or a scoop if you like.  About a 1/4 cup per bath works nice.

The fun about bath salts is that they are easy to make...and you use the ingredients you have, or can easily get.  For my last bath I just threw Epsom and Sea Salts in a bowl with a few drops of Orange, Lavender and double the Jasmine Essential Oils, then I gradually stirred in Avocado Oil.  It smelled amazing... I think Jasmine is becoming my new favorite scent and the Avocado was moisturizing but still light on my skin. Awesomeness!!

Happy Bathing... Enjoy your tub time!

Sunday, December 22, 2013

Quick and easy Homemade Gifts- Soothing Bath and Herb Tea Bags

Well, as Christmas QUICKLY approaches I decided to try and do some quick crafts for some of my friends and family.  So, I searched for my camera, and halfway through, once I got the rhythm down, I took some photos. It's a quick blog, but I figured it's been a while since I had time to do crafts and post, so I should take advantage and share my project.  

For those who need a simple homemade gift idea, here is this years new experiment:


Soothing Bath Oatmeal and Herb Tea 
 

Here's what you need:

Coffee Filters

Oatmeal
Herbs
Essential Oils
Little Rubber Bands 

If you are lucky enough to have an herb or Tea Shop, or even a nice organic health food store, it's easy to get what you need for these.  This weekend we stopped by Sensibiliteas in Glens Falls, NY and picked up some supplies.  I got some more Lemon Peel, Orange Peel, and the most awesome smelling tea called Truly Wild Cherry.  It's so good I want to drink and bathe in it... but not until after Christmas, so I can really enjoy it!

I also grabbed some plain old coffee filters and a bag of those little Rubber Bands that are used for the weird bracelets... they are the perfect size.  Now, I did add essential oils to enhance the scent of the bath teas, but they are not necessary.  Below is the recipe I used for my first batch of:


Veronica the Lazy Diva's Citrus and Lavender Oatmeal Herb Tea Bags


Ingredients:
Oatmeal

Lemon Balm
Lemon Peel
Orange Peel
Lavender
Lavender Essential Oil
Orange Essential Oil
Lemon/Mint Essential Oil Blend
Apricot Oil... just for the heck of it to enhance the oatmeal blend.

I HOPE I DON'T HAVE TO ACTUALLY POINT THIS OUT-- BUT JUST IN CASE...THESE ARE ADDED TO YOUR TUB!  NOT INGESTED!!  NO DRINKING THIS TEA!  :-)

Step One:  

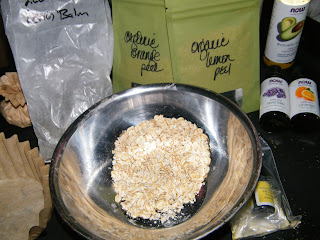
I poured a couple of cups of Oatmeal into a bowl and put just a drop or two of Orange, Lavender and a Lemon/Mint and stirred it up, just for a scent boost.  I also added a few drops of Apricot Oil to add a little more softness and diffuse the potency of the essential oils.  Just keep the drops well dispersed so the oatmeal doesn't become 'wet'.

Sadly, I am so stuffed up today I had to depend on my husbands sense of smell... he said it smelled  nice... so I'm hoping everyone else agrees.  I'll smell them in a few days and find out.  LOL!!

Step Two:

I put a coffee filter on the table and added two spoonfuls of the oatmeal mix, and a spoonful each of the Lemon Balm, Lemon Peel, Orange Peel and Lavender.

Step Three:
My pudgy hand in desperate need of a manicure!

Scrunch the top together gently and put a rubber band around the top. Then spread out the top a little.

Step Four:

Tie a ribbon around them if you like... or put them in a nice box or tin.

So, I tried a bow on the left and I did a loop on the right. 
I figured with the loop I could hang it like an ornament.
Voila!!! 


The nice thing about doing them this way.... it keeps the tub cleaner while you enjoy the benefits of the oatmeal and herbs.

These are a nice and easy way to make a homemade gift, or to just whip up for yourself for a soothing soak.  Experiment, use your favorite herbs.  

Thanks for reading and I hope you have a Very Happy Holiday!!

Sunday, October 6, 2013

Curses Alton Brown... your pickled beets have me BEET RED!

Well, our summer CSA is almost over, and we've moved on to many long storage/cold cellar items, and we are feeling the urge to do some canning.  I had picked up a bag of beets and with my busy schedule and our fall vacation, the beets were starting to go soft, so I knew we had to actually do something with them.  My husband did some straight canning, and I decided to do some pickled refrigerator beets.  This was my first attempt at pickled beets, so when I found a fairly easy version done by Alton Brown, I figured this had to be a good recipe.  He's like an expert, right?  Well... he may be an expert, but whoever put that recipe on foodnetwork.com wasn't paying attention! After reading some of the reviews I had a feeling this was not going to be as smooth as it should have been, but I was somewhat prepared.  One of the complaints was that there was not enough liquid, and another was complaining about the size of the mason jars.  I didn't pay too much attention to the second complaint but I now know it is true.
So, for this weeks blog, I'm going to take you through my adventure in making pickled beets using the Alton Brown recipe I found online.  I did not see the episode, which may have been helpful, but in the end they came out really tasty, so I do recommend the recipe.  Just a few things: make extra liquid, use pint size jars not quarts, roasting times can vary by a lot, and forget about the skins coming off easily...unless you have chef skills, peeling will be involved!  

Here is a link to the original recipe: http://www.foodnetwork.com/recipes/alton-brown/pickled-beets-recipe/index.html

Now here's what I used, and for the record I'm so disorganized and slow in the kitchen, the time quotes were at least double for me.. I'd like to say it's because I documented almost every step, but it's not!

The Lazy Diva's version of Alton Brown's Pickled Beets

STEP 1: ROASTING THE BEETS


 INGREDIENTS:


  • 8-10 small to medium beets, cleaned
  • 1-2 tablespoons of Truffle infused Olive Oil (Dipping Oil)
  • 1-3 tablespoons of Rosemary infused Olive Oil (Dipping Oil)
  •  1 tablespoon of Rosemary and garlic bread dipping mix
  •  1 small onion
     
  • Bake at 400 degrees for 40 - 150 minutes... until they are tender.

  • My beets had been hanging around for awhile so I just left what little greenery and stem they had intact.
    I had no shallots, or sprigs of Rosemary(the plant died :-( so I decided to use what I had which was Rosemary infused OO.)
    Plus, I LOVE the TRUFFLE OLIVE OIL so I work that into a lot of my cooking that requires EVOO.


    As I was preparing the beets I suddenly remembered we had bread dip herbs which contained Rosemary,
    so I grabbed some of those too!


    Instead of dirtying a bowl, I connected two sheets of aluminum foil together and brought the sides up. I placed the beets on the foil then poured olive oils and herbs on top and just rolled them around well to make sure they were all well coated.  Then I folded the foil up and around and tried to make it tight.  I did put a pan underneath to prevent leaking.


    I did add extra foil to the top and put it in a little aluminum pan to prevent dripping.
    Also used a pan when I realized how flexible the whole thing was..


    While the beets were roasting I continued on to...


    STEP TWO:
    The Brine

    INGREDIENTS:

    1 1/2 cups Tarragon Wine Vinegar
    1 1/2 cups Water
    3/4 cups Sugar
    1 tablespoon pickling salt


    Add all the ingredients to a pot, stir and bring to a boil.  Then put aside.


    STEP THREE:
    Prepping the Roasted Beets


    Now this is where the frustration started to increase.... the original recipe said to roast for 40 minutes.  After 40 my beets were still hard as a rock... so I put them back in.  I roasted them for almost 2 hours before they were somewhat tender.  My oven is usually pretty accurate, maybe it was the extra pans, I just don't know.

    Then according to many recipes (not this one) the peels should just come right off.... WRONG!  So about half the peel would come off, then I'd have to take the knife to them. (After speaking of this complete frustration to one of my SILs who roasts beets frequently... she too has never had an easy post-roast peel removal.  Whatever the trick, we don't know it!)


    STEP FOUR:
    SLICING

    Slice the beets, and grab another onion and slice that into strips too.
    Apparently after the frustration of the beets... I forgot to take a photo of the sliced onions.
    Oh well, I took way too many photos this time anyway...plus, you should be familiar with sliced onions.


    STEP FIVE:
    JARS
    The original recipe calls for 2 QUART jars... I feel it should have been 2 PINT jars.  In the end I had one full Quart, one full pint, and enough liquid to fill half a pint jar... (and that was increasing the liquid by 50%).

    So, pretty much all you need to do is layer the beets and onions, until you reach the top of the jar.  I went a bit onion light on mine, but it's all about what you like.  In the end you want a bit of  a gap at the top.


    Then, pour in the liquid brine, once again leaving a gap at the top... and add the lids.  Store in the refrigerator.  For best taste, let sit for at least three days before consuming.


    Notice the one on the left, I didn't have enough liquid...
    I've just been shaking it up..and we've been eating that one first.

    So that was my experience using the recipe from the Food Network site.  I was pretty tired and frustrated in the end, cursing Alton Brown or whoever typed it up and put it on the website, but in the end they did have a good flavor. If there is an episode of him actually making these, I may someday breakdown and watch it to see everything I did wrong.  I'm gearing up to try another round of pickled beets, but next time I'm going to boil them! 

    Thanks as always for reading... now that I have a new laptop, hopefully I should be churning blogs out at a better pace!  HOPEFULLY!


    Thursday, September 5, 2013

    HAMMING IT UP..... Quick and easy Ham and Pepperoni Crescent Roll ups

    I took a little blog vacation, but now I'm back, refreshed, and hopefully I'm going to be more inspired in the future.  Today is not that day, but I figured I'd do a blog warm-up.  I'm upfront about my laziness, and I may have mentioned I work a bunch of hours....normally 4 days a week.  When a holiday like Labor Day comes around, I work 6.  Now I am always happy to complain about my crazy schedule... but I can't compete with my hubby, not only does he work 12 hour days, he works a swing shift on top... it's 4 day on 2 days off, and then it flip flops from day to night every week. IT'S CRAZY!!!  Today is day 4 of his night schedule, and is one of my days off, so I decided to be nice and cook.  Now I have a few meals that I want to make that involve a crockpot and time, but I slept in way too late and had errands to run, so quick and easy won.  

    For Christmas last year my husband's company gave the employees each a big old frozen ham. This was pre-blog....but I did a kind of fun self-challenge... since it's just the two of us, (not counting the animals,) I decided to see how long and far I could stretch this ham.  Using pinterest, scouring the internet, and just experimenting I made it almost a full week cooking nothing but ham dishes for dinner.  I made the big old ham and mashed potatoes dinner with ham gravy, ham and scalloped potatoes, ham chowder, and a few other interesting recipes.  Halfway through the week I was almost going to break down and make "holiday bread" a.k.a. "garbage bread".....( my Mom used to make it for Christmas every few years when I was growing up, and I LOVED IT!!)  I just knew I couldn't do it justice, and I didn't have the time to make this into a whole production, so I stumbled on a recipe for crescent roll-ups. Out of everything I made that week, this was by far hubby's absolute favorite... he just LOVED it!  So since then, I've made several variations of meals using Pillsbury Crescent Rolls, and other products.  Probably not the healthiest, but some of the yummiest.... and they are quick and easy which I love.  So, when I spotted the ham steak, and the crescent rolls in the fridge.... I knew what I was making today!


    The Lazy Diva's Cheesy Ham and Pepperoni Roll Ups


    INGREDIENTS:


    Tube of Crescent Rolls
    Cooked Ham
    Pepperoni
    Cheddar Cheese
    Italian Blend Shredded Cheese
    1 Egg

    PRE-HEAT THE OVEN TO 350 degrees.

    STEP ONE: 
    Chop and slice the ham, pepperoni and cheddar into small pieces.  You can use any blend of meats and cheeses you like...these were what I had handy.  I used just a couple slices of pepperoni, to enhance the flavor... but I wanted this to be the ham's show.


    STEP TWO:
    Add an Egg to a bowl, and lightly whisk it a bit.

    Look I used a real bowl!!  Mostly because the paper bowls are too small...


    STEP THREE:
    Add the ham, pepperoni, cheddar, and a handful of the shredded cheese to the bowl with the egg and mix it all together.


    STEP FOUR:
    Open the Crescent rolls and take two out at a time.  Try not to split them up! You want to press and blend the middle seam so instead of two pieces you have one.  Today I used the 'Big and Buttery' Crescents, so I only made four.  If you want more smaller ones, get the regular size crescents, just as yummy.


    STEP FIVE:
    Add the meat and cheese blend to crescent roll and wrap it up.

    I loaded these up since they were the big ones.... in the end you just want to be able to seal them up by pinching the dough so there are no holes or gaps if possible.

    I have two techniques for filling and closing.

    The wrap up... where I put all the mixture in the middle and bring all the dough to the center and pinch it together.


    The roll up... where I spread the mixture all down the dough... then roll it up and pinch the ends.


    STEP SIX:
    Place the dough balls on the baking sheet. (If you weren't already working on it like me!)

    Add a handful of shredded cheese to the top of each mound.

    STEP SEVEN:
    Bake at 350 degrees for 18-25 minutes.  Should be a nice golden brown with the cheese baked in on top.


    STEP EIGHT:
    Take out of the oven, let cool slightly, and enjoy!

    Well, that's today blog... I am now STUFFED!!  

    Hoping to have a big craft day soon.... and hopefully I'll be getting some more blogs out too!! 

    Thank you so much for reading the blog!  


    Sunday, August 4, 2013

    Waiting for my Sour Pickle Face.... Homemade Garlic Dill Pickles are in the Refrigerator

    Happily, I will be able to repel Vampires for several weeks...sadly, I will have to put up with the smell of garlic on my hands for quite awhile.  Still haven't concocted the best method for garlic and onion smell removal... may need to try that metal bar.

    Okay, so last week in my CSA account we had the option of getting a  15 lb cucumber pickling package, so I decided to jump at it.  We did not plant cucumbers in the garden this year, and who doesn't love pickles.  So off I went shopping for all the ingredients, and more mason jars. I felt buying the premixes was just cheating.  Now, the big challenge for doing our own pickling recipe was finding the Canning Salt.  Apparently you can substitute Kosher Salt, but it's not quite the same I've been told.  Now we went to three different stores that had big displays of canning wares, and guess what, no canning salt, just pectin and premixes!  I did find it on Amazon, but I didn't want to wait, so thankfully we did finally find it at our local Price Chopper, but it was quite the hunt! Also, it's funny to note that fresh organic dill from the health food store was cheaper than the fresh container of dill at the supermarket. 

    We bought a few bunches of dill, but I think we bought a little over a pound of garlic... it may have been overkill, but I love garlic, so perhaps if I don't use it up, I'll mince it up and put it in oil.  Also, we've never invested in our own canner, and I didn't get a chance in all my running around to ask my in-laws if I could borrow theirs, so I just did up a few jars for now.  We may break down and buy our own pressure canner soon, just need to figure out which one.  Perhaps, we'll have one by the time the tomatoes are ready.  

    Enough, of my rambling, here's this week recipe:

    The Lazy Diva's Garlic Dill Refrigerator Pickles


    Ingredients:

    About 3-5 lbs of small cucumbers

    Brine:

    4 cups Water
    3 cups Vinegar
    1/3 cup Canning Salt

    Per Jar:

    3 cloves Garlic
    2-3 Pieces of Fresh Dill
    Pinch of Mustard Seed
    Pinch of Minced Onions
    Couple of Peppercorns
    1 Bay Leaf

    Step One: The Brine


    In a pot add the water, vinegar and salt.  Stir and bring to a boil so the salt is dissolved.  Put Aside.

    Step Two: Adding Seasoning to the Jars


    In any order you please add the Garlic, Dill, Mustard Seed, Onions and bay leaf. 

    I forgot the onion, so I substituted the minced.  Also, I only had the Peppercorn Grinder, so I used ground.  It's yet another recipe where you can use what you like, or what you have at hand.

    Step Three:  Slice the Pickles and place in Jar


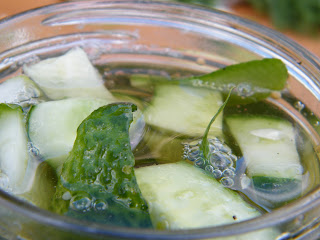
    Now I mostly did spears. But I did shake it up a little with different slice widths. I just crammed them in as best I could.

    Step Four:  Pour in the brine, and place the lid on.


    For best taste you should wait at least a week to enjoy the Pickles!  Then you can make a Sour Pickle face like my niece learned on Barney.  She's two and loves pickles, I'll have to see how she likes the homemade variety!


    Notes:  
    I used distilled (white) vinegar for the majority, but I noticed on Pinterest some recipes specifically said Apple Cider, so I did a small batch with that.  From the outset, the brine tasted saltier with the Apple Cider, but perhaps there was a little salt residue from the first batch or I put a hair more salt in....or it was all in my mind.  Who knows...

    The joys of doing the jars outside, clean up is a BREEZE!  (Okay, I scraped it up and tossed it in the hedgerow, but it's a lot easier than scrubbing counters and the stove!)  

    AND the pictures come out a lot nicer!


    Perhaps I'll do more pickles in a few days,
    but that's it for this weekend!