Showing posts with label #giftideas. Show all posts

Thursday, July 10, 2014

A Solid Way to Moisturize and Massage Your Skin using LOTION BARS

Years ago I found a recipe for Massage Lotion Bars.  Out of everything I have made these were, and still are, one of my absolute favorite items.  Knowing and loving these bars as I do, I've often marveled at how big of a mystery they seem to be to other people.  

For a few years I tried selling products at a little craft fair, and while I sold a few items, the Lotion Bars did not really sell.  Part of the issue was packaging.  I would wrap them up in clear plastic craft bags with a label, and that didn't work that well.  I tried tins, and they did a little better, but still I barely sold any. (I still haven't found a great way to package these.) One year I took some of the scraps and put them out on a tray as samples, I spent half the time stopping people from eating them, and explaining what they were. People just didn't seem to get the concept.  However, in my years of making these I have introduced and successfully converted a few friends and family members over to the Lotion Bar side.  Some are still confused.... but maybe someday they will learn!

For those not familiar, Lotion/Massage Bars are supposed to melt at skin temperature.  You do not add water, you just rub them onto your bare skin and let them work their magic. It's like body lotion and massage oil combined into a solid form. Since they melt on your skin they absorb nicely, and they are great for softening and moisturizing with less mess. They also smell amazing! I can understand why people wanted to eat them!

The formula for making these bars is fairly simple, and it's all about melting points:

1/3 Hard (Beeswax, Soy)
1/3 Medium (Cocoa Butter, Shea Butter )
1/3 Soft (Apricot, Olive Oil, Sunflower, Avocado, Coconut, etc...)

Here is my recipe for a small batch (about two bars):


Veronica the Lazy Diva's Cocoa Butter and Coconut Oil Lotion Bars


Ingredients:
2 oz Beeswax
2 oz Cocoa Butter
1 oz Coconut Oil
1 oz Apricot Oil
3 drops Vitamin E
Essential Oils (optional)  (I used 3 drops of Jasmine and 2 drops of Orange)
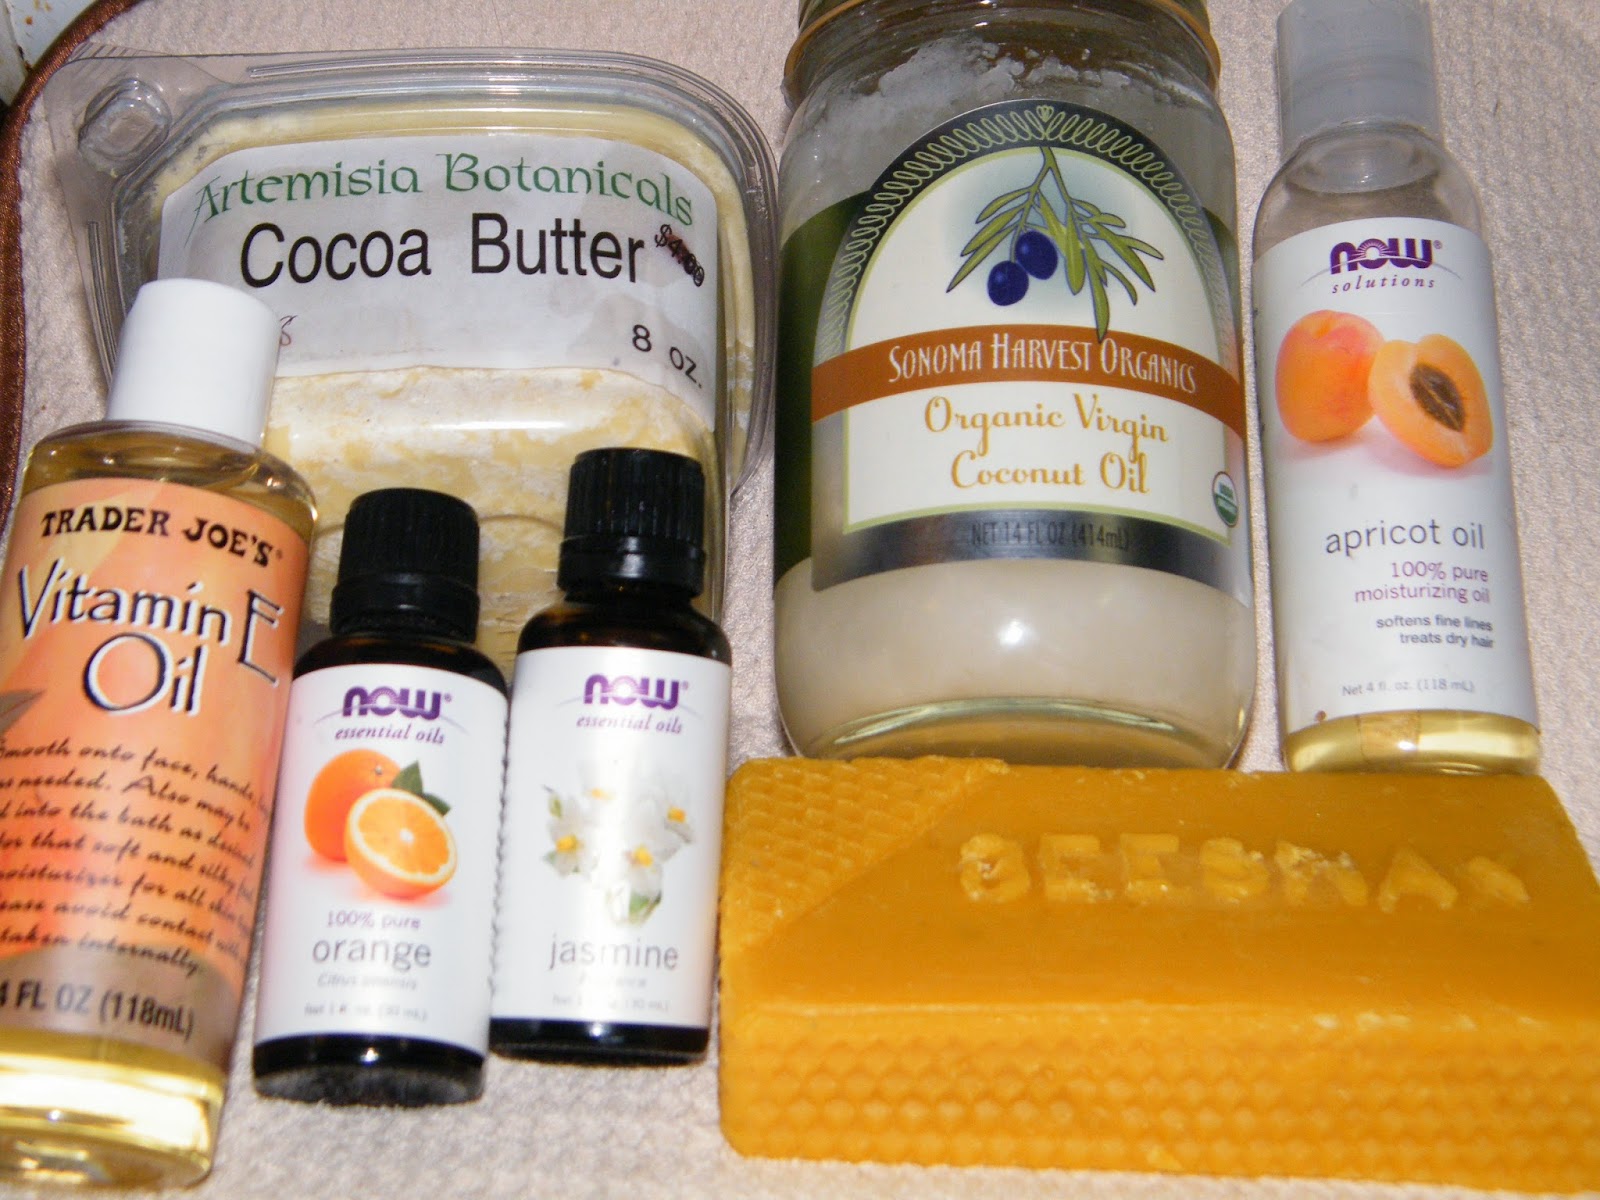
You'll also need some sort of mold to pour these into when finished.

I have 'craft' designated crock pots and that's what I personally use when I make these.  You can do these in a double boiler, or even in the microwave one at a time starting with the hardest items and working down. 


STEP ONE:

I came across a bag of smaller pieces, so I used this instead of cutting the block.

ADD THE BEESWAX AND LET IT MELT COMPLETELY


STEP TWO:


ADD COCOA BUTTER AND STIR UNTIL IT IS MELTED COMPLETELY


STEP THREE:


ADD COCONUT OIL AND STIR


 STEP FOUR:


ADD APRICOT OIL AND STIR


STEP FIVE:


ADD VITAMIN E AND ESSENTIAL OILS (if desired) AND STIR

These three ingredients are optional, half the time I leave the essential oils out.  The Cocoa Butter and Coconut Oil have such an enticing natural smell you don't really need to add scent,  I just added a few drops to bring them up to the next level.  The Vitamin E is also a go to ingredient in most of my projects, it ups the moisturizing and is a natural preservative.


STEP SIX:

I did this batch just for me, so I just used a couple of random molds.
The silicon one is actually a muffin mold I got in the bargain section of a department store.

POUR INTO MOLDS AND WAIT UNTIL COOL
These set fairly quickly, but you can stick them in the freezer to speed up the process.


STEP SEVEN:

The beeswax leaves particles that settle to the bottom, but I think it adds to the design.


ENJOY!


So, those are my lotion bars!  I hope I have enlightened you and inspired you to give them a try!  There is a bit of trial and error as you experiment, but the nice thing about them is you can always remelt them and add more oil or beeswax if you need to.  They're also fairly quick and easy to make. Once the beeswax melts everything else goes quickly.  They make nice gifts as well, but you may need to explain or include a note about how to use them.   

NOTES:  
I have not done much experimenting with Soy, but I believe it has a slightly lower melting temperature, so if you try to make these without Beeswax, you may need to adjust the hard/soft ratio ever so slightly.

You can also make this more of a salve and pour directly into tins.  I would just add about 1/2  or 1 more oz of oil to the mix to soften it up.


THANK YOU AGAIN FOR CHECKING OUT THE BLOG!!


Sunday, December 29, 2013

Making Bath Salts.... the ones for your bath, NOT the other kind

Anytime I mention I'm making bath salts, I get a lot of jokes about the other kind of bath salts.  So, maybe I should come up with a cool new name like Super Salt Soaker, or Scented Salty Water Softener... or perhaps I should just call it 'Awesomeness!'  (Or, just stop mentioning it in front of certain people!)

Whatever you want to call them, I think they are just great, and super easy to make.  They take mere minutes to throw together and the hardest part is gathering supplies.  Since, as I've mentioned previously, I hoard craft supplies, I have enough ingredients to make about 20lbs worth with about 100 different scents.

Some people only have showers, and some people don't use their tubs, and I think that is such a shame.  If I'm ever having a bad day, or just want to relax with a good book, or a good movie or tv show.... I hit the tub!  Yes, I am one of those 'crazy' people who will drag their laptop into the bathroom, and watch tv and movies on it. Years ago I think I spent over 4 hours in the tub because I got caught up watching a season of 'LOST'... the key is when the water cools you drain some out, and refill a little with more hot water. ;-)  I also love to light candles, add scented bath salts to the water, turn the lights off and soak!  It's such a non-guilty pleasure that more people should embrace! Perhaps, I've shared too much, but I do love a good soak!

For my own use I usually just grab a bowl or jar, throw in some epsom, some dead sea salts, regular sea salts, celtic sea salts, any combination of what is in the front of my craft cabinet, add a few drops of Jojoba oil, sweet almond oil or my new go-to Avocado oil, then add a few drops of essential oil or a scented blend.  Mix with a spoon and Voila!

When I'm making a gift for other people however, I put a bit more effort into it.  For todays blog, I was working in the middle of the night and just wanted to throw something together quickly.  I made a mess, couldn't find a few things, made some last minute substitutions, and never got the finished shot of the jars... well, maybe I'll add it later in better lighting. 

THE LAZY DIVA'S LAVENDER AND EUCALYPTUS 
SUPER SALT SOAKER RECIPE


Ingredients:  
Yes, I made a last minute scent change...
I decided to go with the tried and true Lavender Eucalyptus instead and didn't retake the photo.
Epsom Salts
Sea Salts (Regular, Dead, Celtic or whatever else), 
Oil (Sweet Almond, Avocado, Jojoba, Apricot, or etc..) 
Lavender Essential Oil, 
Eucalyptus Essential Oil, 
dried Lavender and dried Eucalyptus leaves (optional), 
Purple and green coloring (I usually use soap making or cosmetic coloring, but this too is optional).

You'll also need a pint jar to put them in, and two gallon size plastic ziploc (or whatever brand) bags.  

 1)  ADD SALTS

Take your plastic bags and put 1 cup of Epsom Salts and 1 cup of Sea Salts in each bag. I did a double batch here, so I filled two pint jars up with salt, then added them to the bags to make sure they were packed tight.

2) ADD HERBS (Optional)

In bag one add lavender and shake it up.  In bag two add Eucalyptus, and shake it up.  I went really light with the herbs this batch since they can be a little messy in the tub.

3) ADD MOISTURIZING OIL (Optional)

I like to add about a tsp of oil to each bag, for moisturizing, but it's best to do it gradually. Add a couple of drops to each bag, close the bags, shake and work them up good, add a few more drops, shake them up good, and repeat once or twice more.   This batch I used Avocado..since it was handy.

4) ADD ESSENTIAL OILS
In bag one add a few drops of lavender, shake it up, and repeat.  In bag two add a few drops of Eucalyptus, shake it up, and repeat.

5) ADD COLOR
I used a more natural sea salt blend that had a slight pink hue,
which would have been great for the peppermint I planned,
but for the Lavender, I think I added a bit more color than usual.


For a decorative look, I gradually add purple to bag one, and green to bag two, and like above, shake and repeat.  I went through a big melt and pour soap making stage so I have a bunch of soap colors, just keep adding until you get the color you want. 


6) LET DRY FOR A BIT
This picture shows the color a little more accurately. 

Sometimes pressure builds up, so you want to let it dry out a bit to make sure there isn't an issue.

7) ADD SALT TO JARS

I tried to even out the layers with a spoon.
Now for some decorative fun...I usually do layers.  I snip off one of the bottom corners on each bag, or fold over the top and just alternate adding salt to the jar.
Okay... some of my lines were a bit wavy but not too bad!


8) DECORATE THE JAR

When making a gift I usually use the canning jars and put a square of fabric between the lid and the jar.  You can either cut your own fabric, or if you are scissor challenged and lazy like I am.... I buy the pre-cut squares as I've mentioned in previous blogs.  You can also add a label, and/or a scoop if you like.  About a 1/4 cup per bath works nice.

The fun about bath salts is that they are easy to make...and you use the ingredients you have, or can easily get.  For my last bath I just threw Epsom and Sea Salts in a bowl with a few drops of Orange, Lavender and double the Jasmine Essential Oils, then I gradually stirred in Avocado Oil.  It smelled amazing... I think Jasmine is becoming my new favorite scent and the Avocado was moisturizing but still light on my skin. Awesomeness!!

Happy Bathing... Enjoy your tub time!

Sunday, December 22, 2013

Quick and easy Homemade Gifts- Soothing Bath and Herb Tea Bags

Well, as Christmas QUICKLY approaches I decided to try and do some quick crafts for some of my friends and family.  So, I searched for my camera, and halfway through, once I got the rhythm down, I took some photos. It's a quick blog, but I figured it's been a while since I had time to do crafts and post, so I should take advantage and share my project.  

For those who need a simple homemade gift idea, here is this years new experiment:


Soothing Bath Oatmeal and Herb Tea 
 

Here's what you need:

Coffee Filters

Oatmeal
Herbs
Essential Oils
Little Rubber Bands 

If you are lucky enough to have an herb or Tea Shop, or even a nice organic health food store, it's easy to get what you need for these.  This weekend we stopped by Sensibiliteas in Glens Falls, NY and picked up some supplies.  I got some more Lemon Peel, Orange Peel, and the most awesome smelling tea called Truly Wild Cherry.  It's so good I want to drink and bathe in it... but not until after Christmas, so I can really enjoy it!

I also grabbed some plain old coffee filters and a bag of those little Rubber Bands that are used for the weird bracelets... they are the perfect size.  Now, I did add essential oils to enhance the scent of the bath teas, but they are not necessary.  Below is the recipe I used for my first batch of:


Veronica the Lazy Diva's Citrus and Lavender Oatmeal Herb Tea Bags


Ingredients:
Oatmeal

Lemon Balm
Lemon Peel
Orange Peel
Lavender
Lavender Essential Oil
Orange Essential Oil
Lemon/Mint Essential Oil Blend
Apricot Oil... just for the heck of it to enhance the oatmeal blend.

I HOPE I DON'T HAVE TO ACTUALLY POINT THIS OUT-- BUT JUST IN CASE...THESE ARE ADDED TO YOUR TUB!  NOT INGESTED!!  NO DRINKING THIS TEA!  :-)

Step One:  

I poured a couple of cups of Oatmeal into a bowl and put just a drop or two of Orange, Lavender and a Lemon/Mint and stirred it up, just for a scent boost.  I also added a few drops of Apricot Oil to add a little more softness and diffuse the potency of the essential oils.  Just keep the drops well dispersed so the oatmeal doesn't become 'wet'.

Sadly, I am so stuffed up today I had to depend on my husbands sense of smell... he said it smelled  nice... so I'm hoping everyone else agrees.  I'll smell them in a few days and find out.  LOL!!

Step Two:

I put a coffee filter on the table and added two spoonfuls of the oatmeal mix, and a spoonful each of the Lemon Balm, Lemon Peel, Orange Peel and Lavender.

Step Three:
My pudgy hand in desperate need of a manicure!

Scrunch the top together gently and put a rubber band around the top. Then spread out the top a little.

Step Four:

Tie a ribbon around them if you like... or put them in a nice box or tin.

So, I tried a bow on the left and I did a loop on the right. 
I figured with the loop I could hang it like an ornament.
Voila!!! 


The nice thing about doing them this way.... it keeps the tub cleaner while you enjoy the benefits of the oatmeal and herbs.

These are a nice and easy way to make a homemade gift, or to just whip up for yourself for a soothing soak.  Experiment, use your favorite herbs.  

Thanks for reading and I hope you have a Very Happy Holiday!!