Monday, June 24, 2013

Super Easy Air Freshener Recipe, Smoked Pork Recipe in Progress....and meeting Neil Gaiman!

So, this past week I was on VACATION, which was really a STAYCATION where we planned to get so much done.... ha, ha, ha!!  I had lofty plans of blogs, and perhaps breaking down and cleaning the house.  I didn't accomplish either of those entirely.  I did however go to Saratoga Springs, NY to see Neil Gaiman on one of his book signing tour stops!


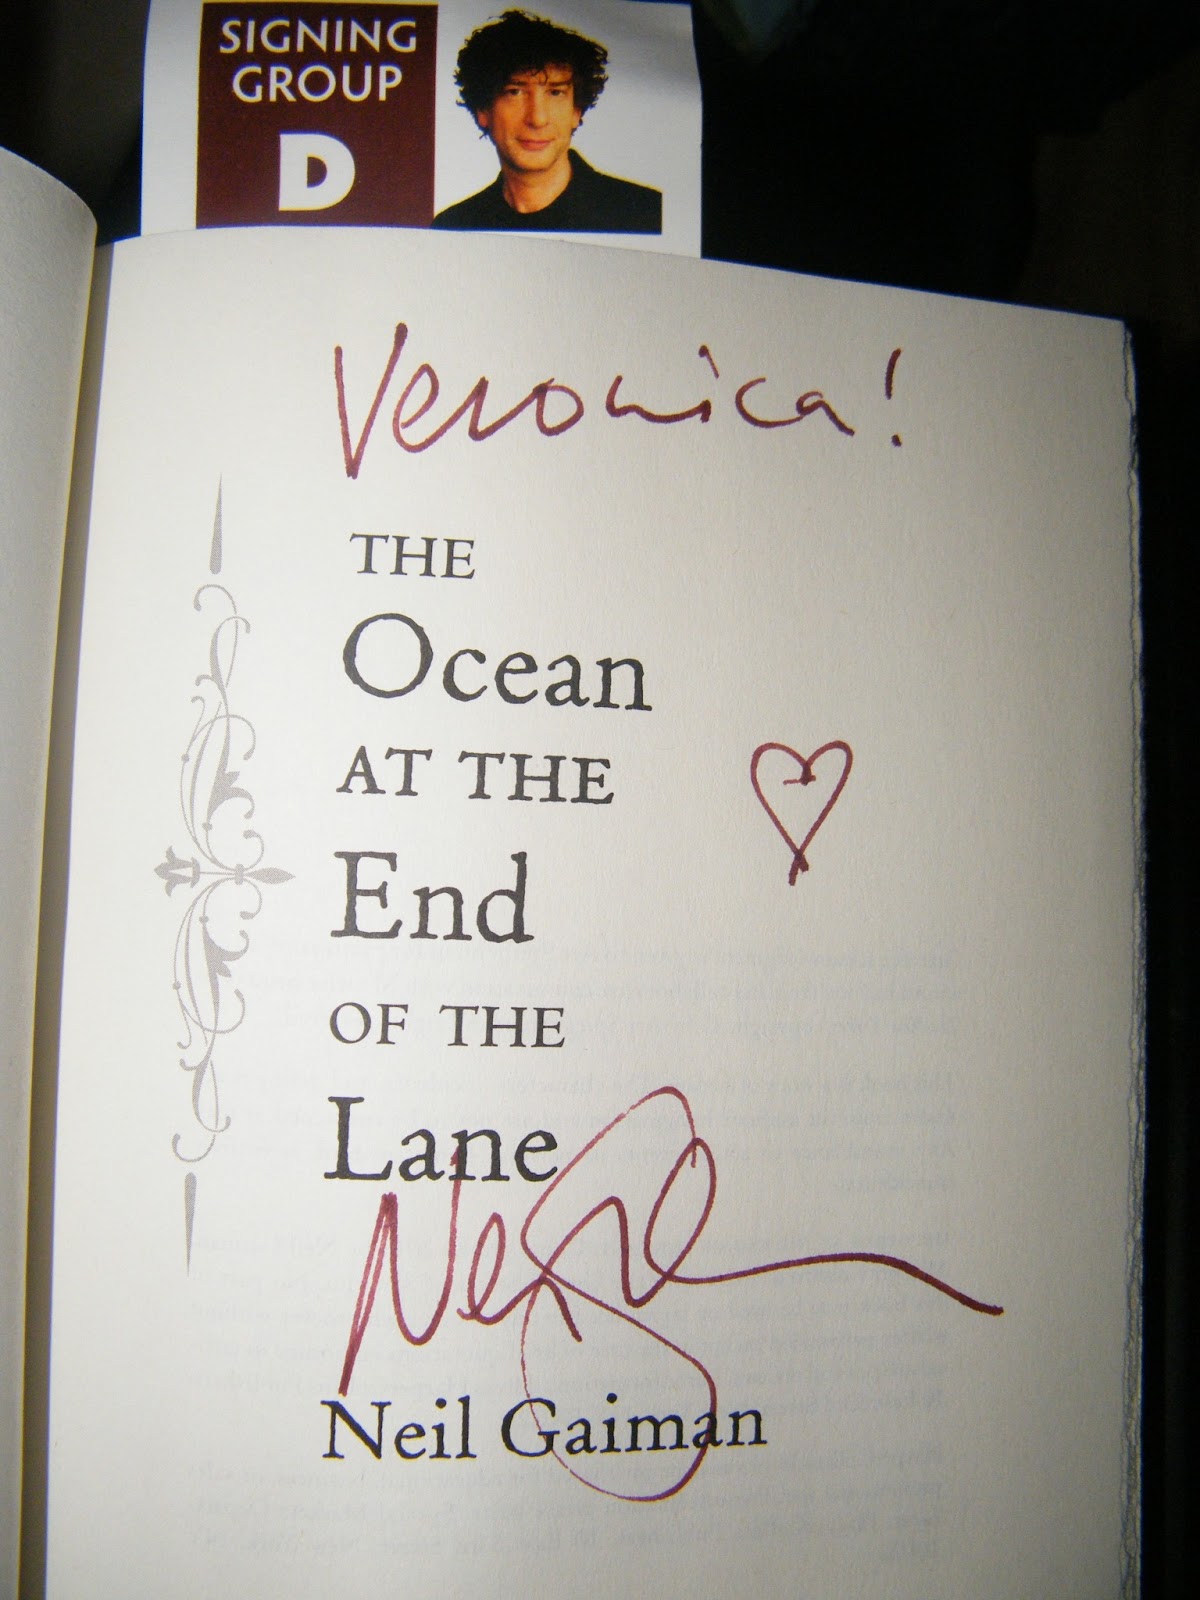
While there they taped an episode of OFF THE SHELF: Authors in Conversation with Joe Donahue
- Neil Gaiman presenting THE OCEAN AT THE END OF THE LANE. (Neil Gaiman is on the right)
I'm totally going to geek out for a moment... I was just so excited.  He is such a great writer, and a wonderful speaker.  I love when he narrates his own audio books too, he's just great!  So, my inner fan girl made an appearance, and after waiting in line for a couple of hours I got Mr. Gaiman to sign my copy of his new book, and my Kindle!


Okay, fan girl moment over.... as I mentioned at the top of the blog, I didn't really do any blogs this week, and I felt bad.  So, after a pathetic power push on cleaning, and realizing that my sleep schedule is completely blown and I'm going to be a walking zombie in the morning, I decided to just do a quick blog whilst cooking dinner.  I would have made dinner the main recipe of this weeks blog, but it was a weird experiment that I feel I might improve upon.  Instead this weeks main blog is an air freshener recipe that's been all over the internet and takes only a few minutes to make.  Just because it's so simple, I also threw in pictures and the recipe I made tonight.  If you try it, or have any suggestions, let me know.


RECIPE ONE:

THE LAZY DIVA'S SMOKED PORK AND BRAISING GREENS EXTRAVAGANZA


INGREDIENTS:
Smoked Pork
Braising Greens and Mustard leaves (?)*
2 tbs. Balsamic Vinegar
1 tbs. Garlic
1 tbs. Butter.

I cooked the pork for a bit, slapped some butter and garlic in the pan, added the braising greens with mustard leaves (?) and then the Balsamic Vinegar.  Voila!

*There is a question mark because I am part of a CSA, and I get things sometimes and totally forget exactly what the name is... I know the braising greens, just not sure what 'mustard' item they mixed in!


My Husband gave it his seal of approval and said he really enjoyed it, but sometimes I think he enjoys things simply because he didn't cook it!  LOL!  

RECIPE TWO:

THE LAZY DIVA'S SUPER EASY AIR FRESHENER


INGREDIENTS:
Baking Soda
Essential Oil or Fragrance Oil

Pour Baking Soda into a container, slowly add 10-20 drops of Essential Oil or Fragrance Oil while stirring and either add a lid with wholes, or sheer fabric.  Shake it up ever few days to keep it working.  
After about a month or when the scent fades, just make a new one.

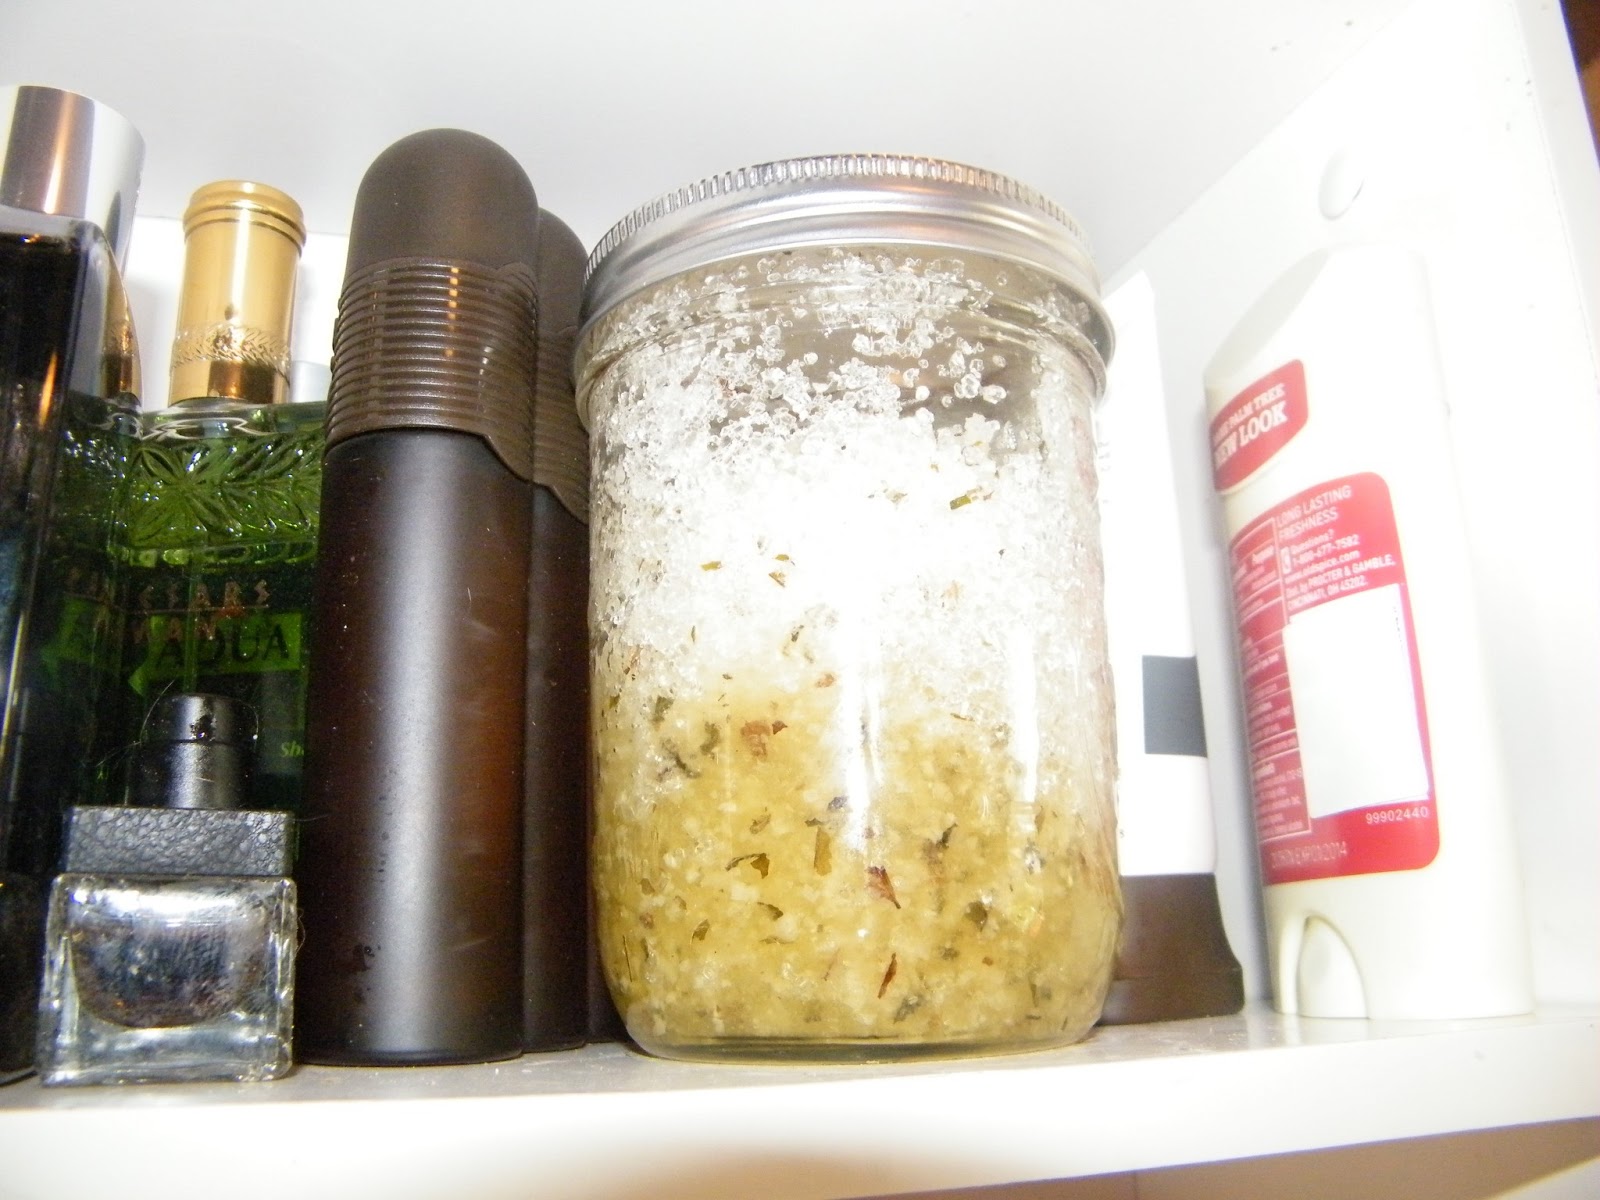
In the first version I used a mini mason jar, and added some orange and lemon essential oils.  (I picked these up from a local Arts and Crafts festival the previous weekend.  I'll do a little plug and share their website since their products have a wonderful scent, are affordable, and being in the next state over, their pretty close by and the owners seemed nice in our brief conversation...www.scentastics.com.)  Since I have CRAZY animals, which is why I love and need to use air fresheners, I need to cover them up.  For a more decorative look, I grabbed some sheer fabric I had kicking around and placed this over the jar.  It lets the scent through nicely, and it keeps the critters out of it.  In the past I've used baby jars too, and just pounded wholes in the lid.


In my second version, I did some upcycling of a KFC single serve container.  I just cut a few triangles in the lid and that was it!  It's going to be upstairs in the bedroom, so A) I used Lavender to promote sleep and B) Don't care what it looks like, because no one else is going to see it!  

As demonstrated these are super easy, and you can use pretty much anything to put them in.  If you don't have pets that get into and knock things over, then you don't even need to cover them up!  In a month or so, when the scent is faded, you can pour them down the sink, follow with some vinegar and hot water and clean  your pipes.  Or, sprinkle on your carpets, wait a bit, and then vacuum it up. (A bit of a warning, this can clog up your vacuum over time, so if you do this, be aware you may need to clean it depending on which type you have!)  


(Sorry if some of the photos are a little blurry... had to fight the dying batteries!  My Neil Gaiman picture taking spree really wiped them out!)

As Always, Thanks for Reading!

Monday, June 17, 2013

Recipe of the week...Lasagna for the Birthday Man and Kitchen Rental.... Blog on location

So, my husband's birthday was today and upon thinking of what to do or make, I stopped on his favorite meal of lasagna with Cheesecake for dessert.  Time, energy, and familiarity-wise I decided to make one or the other.  I chose to make the lasagna and buy the cheesecake... I haven't made cheesecake in so long and didn't want the hassle.  So, I bought the store standard Turtle Cheesecake, I figured I'd make one myself at a later date or save up my money for a New Skete cheesecake.

Now, my husband had to work today, our stove is being a pain, and we usually get together to play games at  my brother and sister-in-laws house and I was running behind.  So, I decided to make an offer of a pan of lasagna for the use of a kitchen.  Plus, I hate cleaning so I figured if I cooked... they could clean.. :-) and my least favorite part was taken care of!  It's just as easy to make 2 pans of lasagna as it is 1, so off I went.

Much like many of the things I make, it's all about what you like... I'm not a fan of peppers and onions, so I left those ingredients to the pre-packaged sauce. Also, I just eye-balled a lot of the layers.  Make as many layers you like, or the pan can accommodate.


The Lazy Diva's Two Meat and
Four Cheese Saucy Lasagna

Ingredients for Two Pans of Lasagna:

3 1/2 lbs + Hamburger
1 lb + Sausage
2 boxes Oven Ready Lasagna Sheets
Sauce
(1 Lg Prego Traditional, 1 Lg Ragu Traditional, 2 jars Newman's Own Sockarooni)

Lg Ricotta
4 cups shredded Mozzarella
3 cups shredded Asiago
3 cups shredded Parmesan
1 lb (or so) Mushrooms
2 tbs Garlic
2 eggs
1 tbs Italian Seasoning

1) Brown Meat and cook Mushrooms

I added a little garlic to all three pans, and browned them separately, but I suppose you could do one big skillet. Drain the meats and put aside.

2) Prep the Ricotta Cheese

Crack two eggs into a bowl, add the ricotta, and sprinkle Italian Seasoning over and stir it all up.  Put aside.


3)  Mix the Sauce


Add all the sauce to a big bowl and stir it up.  Put aside.  Growing up my parents used to mix Ragu and Prego together when making spaghetti and meatballs.  So I continue the tradition, but I found the Newman's Own Socarooni sauce and it has a bunch of ingredients I decided not to cook with and has a nice flavor, so I decided to go with it.  


4) Add the Layers

First Layer
Add sauce to bottom of the pan and float 3 sheets of Lasagna on it.

Add a layer of Ricotta across the pan


Add a layer of Mozzarella


Add a layer of Hamburger

Add Mushrooms

Layer 2
Add sauce and float 3 more pieces of Lasagna

Add a layer of Mozzarella

Add a layer of Sausage and Mushrooms

Add a layer Asiago and Parmesan


Layer 3
Add sauce and float 3 more pieces of Lasagna

Add a layer of Ricotta across the pan

Add a layer of Hamburger
Add Mushrooms and Mozzarella

Final Layer 
Add Sauce and float final 3 pieces of Lasagna
Add more sauce on top of Lasagna

Add a layer of Mozzarella, Asiago and Parmesan to finish off the top


5)  Bake


Cover in Aluminum foil and bake at 350 degrees for 30 minutes.  Remove Cover and cook for an additional 10 minutes until the top layer of cheese is melted and sauce is bubbly.


Special thanks to my 2 year old assistant Gabby who emptied out all the grocery bags (and my purse) one item at a time and handed them to me, and to her parents for the use of their kitchen. (And for cleaning up my mess!)  Much Appreciated!


And, as Always, Thanks for reading my Blog!

Monday, June 10, 2013

Excuses, Carrot Salad and a Big Project!

Sandy and Shelly, the sleep depriving, Wild and Crazy Cranky Duo!
Let me start out with my excuses! I had a rough week sleep-wise thanks to a little Sugar Glider named Sandy who refused to be caught twice this week, until the wee hours of the morning.  She is the fastest, most stubborn girl in the whole house (next to her twin sister!) I was going to add cranky to the list...but I've often been told that I hold that title exclusively. :-)  I think it's a close competition, though  I also had a touch of insomnia, a book I stayed up late reading one night, and a few other things... I'm pretty sure I have ADD.  I also had a bunch of projects this week, so I did not throw together a unique project for the blog.  Reverting back to my elementary/high school days I'm throwing this together at the very last minute with whatever I have to work with close at hand, and of course with as little effort as possible.  :-)  So, with the excuse portion out of the way, here's this weeks blog...

One of the things I worked on this weekend was a side dish to bring to a dinner party.  A cold side dish was suggested, so the challenge was to come up with something other than Potato Salad to go with the meal.  Looking around my kitchen my eyes landed on carrots.  (I participate in a CSA and our first vegetable drop included a bunch of carrots, and I still had some in the fridge!)  Sooo.. off to the internet I went to find a unique dish and some inspiration.  Here's what I came up with... I didn't realize at the time I was going to cob together a blog, so no blow by blow pictures, but this is what I made.

The Lazy Diva's Sweet Pickled Carrot Salad

These are the leftovers... the bowl was full last night!

INGREDIENTS:
1 lb shredded carrots
1 1/4 cups Sugar 
1 cup White Vinegar
1 cup Water
1 tablespoon Mustard Seeds
6 Whole Cloves
2 Cinnamon Sticks

1) SHRED THOSE CARROTS
I used the biggest shredder/grater blade on my big cow bell looking shredder. If you have all the patience in the world feel free to cut the carrots into strips of about 1/8 or 1/16 of an inch thick.

2) BLANCH
Throw the shredded carrots into a pot of boiling water for 3 minutes, then quickly remove and pour into a strainer. Immediately run under cold water (or drop in ice water) and rinse the carrots. DRAIN and put aside.  

3) The PICKLING SAUCE

Throw all your ingredients into the pot (same one as before if you like!), stir them all up, and bring to a boil.  Let boil for a minute, than drop it down to low and let simmer for about 10-15 minutes. 

4) MIX IT ALL TOGETHER

Add the carrots and the sauce together.  (In true Lazy Diva style I just added the carrots to the pot!)  Stir it up, let it cool, then place in the refrigerator overnight (or at least 8 hours).

5) DRAIN

Pour the contents of the pot into a strainer again to remove the pickling sauce, and try to find all 6 of your cloves and Cinnamon sticks.  (If you can't find all the cloves, (there's usually at least one rogue one,) at least give a warning that there may be some on the loose!)

6) SERVE AND ENJOY

Everyone seemed to enjoy the carrot salad and I thought it was a hit.  It had a unique and refreshing taste, and was sweet and pickly (is that a word?) at the same time.


My new scanner and two 300 pocket albums to help organizing
My other project this week was a BIG ONE....it's a huge time sucker and is far from over!  I ended up buying this little portable scanner awhile back, promptly forgot about it, then had no idea where it was when I did remember it!  My husband found it last weekend and set it aside for me.  I was super excited and I decided to tackle the world!  Okay, I just decided to test the levels of Snapfish and my patience, and started to archive the family photos. This scanner does negatives and slides and turns them into digital photo form, and I remembered we had a TON of negatives kicking around, so I started the project.  (Of course many of the negatives have disappeared.)


One of the more eclectic nonsensical pages
I started with some of the photos I had in my tote. Then I decided to raid my Mom's collection.  She has this big old trunk packed full of photos, papers and such and it is a horrible disorganized mess!!!  She ended up with photos from both branches of my family, and they all are thrown together and completely randomized.  Also, Grandma G. was a bit of a scrapbooker, but not in the highly organized way, she just randomly filled pages.  The same with photo albums, she just grabbed photos and plugged them in.  She also liked to cut people out of photos and place them in random places, then sometimes she'd relocate the photos... and leave blank spots.  So, I have a lot of work ahead of me!  

So with a lot of patience, Ziploc bags, and luck I'll try to muddle through!!  I've tried to do some genealogy and I'm very interested in family history, so I encourage everyone to tackle a project like this.  What if there was a fire, hurricane, tornado, or some other tragic event?  These are the items you can't replace!  Plus, it's great to take these photos and share them with the whole family!

I need more Ziplocs for  sorting!!!
Ugh... stayed up too late on this blog, but I finished!!  (Seriously, just like high school!!)    LOL!!


Thanks as always for reading!


Sunday, June 2, 2013

It's Sandal Season... Time to Polish and SCRUB Those Feet

One of the things I remember about my maternal grandmother was that she had a bunch of shoes!  My Mom's theory was that she overcompensated because she grew up during the Great Depression and growing up they couldn't afford new shoes.  So new shoes meant something to my Grandmother, she wasn't a Carrie Bradshaw with a closet full of expensive and fashion forward shoes, (at least not later in life,) they were all inexpensive and pretty practical.  Grandma just seemed to love to buy shoes!  Me, I buy shoes out of necessity. Very rarely have I fallen in love with a pair of shoes and just had to have them.  (Well, there was this pair of slip-on purple and pink tie-dye sneaker/loafers...but that was a very rare purchase for me!)

For shoes, I usually have a 'seasonal' pair, and a 'dress up' pair....  In winter I wear the same sneakers  or loafers every single day, and in summer I wear the same sandals, every single day, unless of course I'm going to a fancy party or wedding.  I just replace them when they get worn out or get damaged.  I really have no fashion sense!  

With that long explanation about my weird shoe habits out of the way...today's blog was going to be one out of necessity.  We had some rainy days and my sandals got SOAKED, and somewhere along the way I got crud on the inside.  They smelled BAD!  Since it's only just turned June, I knew I couldn't go another 3-4 months with my sandals in this condition, so I decided to make a deodorizing shoe powder and treat my sandals.  THEN just as I was getting mentally psyched for the project, the strap on one of my sandals broke, and I got rid of them. No more odor!  So, now I'm in the new pair (I went with the strapless design to prevent another broken strap) and my issue is....dry sandal feet.  Not as bad as dry cracking winter heels, but my feet could use some TLC.  If they are going to be out on display, I want my fat hobbit feet to look their best! On that note... here's my recipe for this week, it's another scrub, this time with some salts.  Once again, substitute what you like!  (It's about equal parts salt and oil and whatever you want to add!)

There are my Fat Hobbit Feet...in desperate need of Sun and TLC!
The Lazy Diva's Lavender and Peppermint Foot Scrub and Soak

1 cup Epsom Salt
1/4-1/2 cup Sea Salt
1/2 Jojoba Oil
1/2 Coconut Oil (melted)
3 tsp dried Lavender
3 tsp dried Peppermint
1 tsp Vitamin E
8 drops of Lavender Essential Oil
8 drops of Peppermint Essential Oil

Makes 1 Quart....  Once again, a great Mason Jar project or Gift Jar!

1)  Grab your 1 quart Container

I'm doing this Lazy Diva style and just pouring everything straight into the final container.  It's one of those scrubs where you're going to have to stir before each use anyway, so why add more to the clean up!  Since I grabbed a regular jar instead of the wide mouth, I created a makeshift funnel using a styrofoam

2)  Pour in your salts

I chose mostly Epsom because it is great for sore feet and muscles.  Then I added some 'Dead' Sea Salts because A) I had some kicking around and B) They are supposed to be good for your skin and help with arthritis and such.  I also threw in a scoop of Celtic Sea Salt, once again, because I had some kicking around, and I'm sure it has magical powers like the others too!  (They sell it at our local health food store...and I just like to throw it into recipes!)  I just added the salts to a measuring cup liberally.

It was a hot and humid day as I was making this, so it may have played into it, but I ended up adding more salt to fill the jar after adding the Oil.  Do this by sight, last scrub I made did not need as much, but it was a cool, dry day.


3)  Add your Oils

I went with Jojoba and Coconut Oil this hot, muggy, stormy afternoon.  Jojoba is supposed to be a fungicide (so, great for feet) and my stores of coconut oil runneth over (and melted all on their own today)...plus, I love the added moisturizing! I also added Vitamin E, it is said to be a natural preservative, adds antioxidant protection and has other benefits, so why not throw a splash in?  :-)  


Slowly the oil seeps down through the jar...I did add a bit more salt at this point to fill the jar.
As for the Essential Oils.... Peppermint is supposed to work for Athlete's Foot, it has a great energizing scent, and don't feet and Peppermint just go together?  As for the Lavender I've read it's...antiseptic, antifungal and smells great.  (Plus, still have about 3 bottles of it in my craft cabinet.)

4) Add your herbs 

I'm still enjoying the new found use of the coffee grinder, so I threw them in and ground them up. 
In the past, I would leave them whole, but using them in powder form seems to keep the tub, or foot bath, cleaner.

5) Stir it up and close the lid

I always have my trusty plastic spoons ready for the mixing!  Plus, since it's a Mason Jar, I have my fabric swatch ready too!

6)  ENJOY

I usually start out with a spoonful for each foot, and really work it in all over, even between the toes.  I let the formula sit for a bit on my skin, then I put my feet in warm water and let them soak!  SO NICE!!  

Here is a Pure Peppermint batch I did a few weeks ago.
As you can see this had less oil...and it does settle, so stir before use.
**SLIPPERY TUB WARNING**  LIKE MOST OIL BASED BATH PRODUCTS THESE CAN LEAVE A SLICK RESIDUE!

Well, that it for this week!  Coming up I'll probably get to that foot deodorizing powder...hubby has plenty of shoes that I'm sure could use it! Plus, I hit the health food store and picked up ingredients for some nice powder based projects. Dry Shampoo? Body Powder?  Air Fresheners?

We're also getting our garden ready too, so there will probably be an upcoming project on how to keep pesky rabbits, deer and other critters from messing with the garden!  (The kind, natural, humane way!)  I also bought more fabric.... (I may not hoard shoes, but I most certainly have a weakness for nice prints and soft fleeces!)  so, maybe I'll even try out the new sewing machine soon!


THANKS FOR READING!