Sunday, August 2, 2015

Making some Dilly Beans


For years my husband and his family have made Dilly Beans.  They were the pint size mason jars at parties and gatherings, where sometimes a warning would be given about just how 'hot' they were.  I am known for my aversion to hot/spicy food, so I stayed far away.  However, in June my husband and I went to visit my eldest brother to celebrate his sons graduation.  It was going to be a packed house and we wanted to bring down some snacks.  My last visit I had been talking about pickling foods, and my sister-in-law didn't think that she'd had pickled sausages or pickled eggs before (I'm still experimenting with recipes for those!) so hubby and I picked up some pickled sausages from a local store that we love (Locust Grove in Argyle, NY) and he brought some dilly beans he had made last year.  After a little persuasion, and being told they were just a little bit more spicy than the sausages, I finally tried them, and liked them.  They had a bit of a kick, but at least this batch, was more flavorful than overwhelmingly hot.  So this year, I was more than happy to help make them.

I'm going to give 2 recipes, they are pretty much the same, except for the peppers.  The first is the tried and true family recipe, and the second is what we threw together when someone bought the wrong peppers (I won't name names, but the store only had two types and HE thought he'd just get what they had)... and I have a feeling they may be too hot for my liking, but time will tell, and those that like the spicy may enjoy the change in peppers..

DILLY BEANS RECIPE #1

Yields 4-5 Pint Jars

Base Liquid/Brine :
3 Cups Vinegar
3 Cups Water
1/2 cup Canning Salt


Green Beans

Fresh Dill (A stalk or so in each jar)

4 Garlic Cloves (about 1 clove, chopped per jar)

Cayenne peppers (1/2 a small pepper or a 1/4 of a large pepper per jar)
OR
Cayenne pepper powder (a pinch in each jar)

The pepper on the left is a Jalapeno, which we used in Recipe #2.

 Step 1:  Sanitize Jars

Step 2:  Make the brine

Step 3: Cut the ends off of the green beans and trim so that they fit the jar leaving about a 1/2 inch of space from the top.

Step 4: Add Green Beans, chopped Garlic, Dill and Cayenne pepper to the jars.

Step 5: Pour the brine mix into the filled jars, leaving a small gap of space at the top.

Step 6: Boil in a canner for 10 minutes.

Step 7: Remove and let sit until cool.  Make sure that the cans are sealed.

JALAPENO DILLY BEANS RECIPE #2


Yields 4-5 Pint Jars

Base Liquid/Brine:
3 Cups Vinegar
3 Cups Water
1/2 cup Canning Salt


Green Beans
Fresh Dill (A stalk or so in each jar)
4 Garlic Cloves (about 1 clove, chopped per jar)
Jalapeno peppers (1/2 a small pepper or a 1/4 of a large pepper per jar)

Step 1:  Sanitize Jars

Step 2:  Make the brine


Step 3: Cut the ends off of the green beans and trim so that they fit the jar leaving about a 1/2 inch of space from the top.

Apparently putting the jar on it's side and filling it that way helps to pack them in better, according to my father-in-law.  Seemed to work, but had to secure the jars so they didn't roll off the table.

I tried for uniform cutting, so I measured one and left it as a guide while cutting the rest. It also helps to pick the straightest beans you can.


Step 4: Add Green Beans, chopped Garlic, Dill and Jalapeno peppers to the jars.

Hard to tell scale, but we used just one piece of above per jar.


Step 5: Pour the brine mix into the filled jars, leaving a small gap of space at the top.

Step 6: Boil in a canner for 10 minutes.
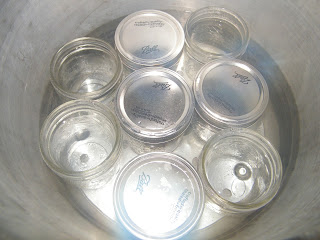
This batch we just did 4 pints, and until the smaller canner shelf I ordered comes in,
we added empty bottles to stabilize the others.

Step 7: Remove and let sit until cool.  Make sure that the cans are sealed.
Step 8: Let sit for at least a few weeks before enjoying.


Well, that's it for our Dilly Bean recipes.  I'll try to remember to update on how the Jalapeno's taste vs. the traditional Cayenne.


Thanks for reading!

Sunday, May 17, 2015

Making Dandelion Wine, and trying not to whine!


My husband has had many more projects than I have lately, he's also had a lot more time.  I would like to think that if I had more free time I'd do more, but really,  I probably wouldn't.  Anyway, one of his newer hobbies has been wine making. I've been meaning to blog some of this, but he usually works on it when I'm not around.  He's slowly getting all the equipment and such, and is toying with the idea of eventually opening a Winery.  Time will tell on that one!


This past week hubby decided to put off mowing the lawn and harvest the bounty that the Dandelion fairies had inundated us with.  Neither of us have ever had Dandelion wine, but we decided to give it a try and see for ourselves.  We spent almost five hours in the sun picking and separating the dandelion petals.  We wanted to do a 2 gallon batch, so we needed at least 12 cups of petals from the recipes we saw. When we started I had no idea that it would take so darn long!  I applied 30 spf sunblock twice, and still ended up with a burn all over my back and shoulders! So now I whine, whine, whine, about making this wine! (Hubby's arms got burned, but he's a man, so he doesn't whine about it, too much.)

Deciding what recipe to use was a tough decision.  Since I was blogging this, he left it more up to me, but after 5 hours in the sun I didn't want to make any big decisions.  So we did this quick mish-mash of recipes.  This may be our first and last foray into Dandelion Wine.  This was experimental, so I'll write a review in six months to a year and let everyone know what the consensus was on the recipe. 

Here's what we did.


Dandelion Wine Experiment 1


Ingredients:

12 cups of Dandelion petals (try to remove all green pieces to avoid bitterness)
2 Gallons of Water
6 Cups of Sugar
2 Oranges (Zest and Fruit (peel the slices out, no pith))
2 Lemons (1 lemon's Zest and Juice from both)
1 packet Champagne Yeast

YIELD:  About 2 Gallons

1) Pick the Dandelions, and separate so you have at least 12 cups of petals.


2) Bring water to a boil, and pour over (or add) petals and stir.  Then place Cheese Cloth over and let steep for at least 3 hours (some recipes say up to 3 days).


3)  Strain the petals out of the liquid using cheese cloth (and a strainer).  Give a final squeeze to the petals to make sure you get as much flavor out as you can.


4) Take the dandelion liquid, and zest 1 lemon, and 2 oranges into it.  Then juice the two lemons into the pot, we did it over a strainer to avoid the seeds (discard the lemons). Peel the oranges, then cut up and place the orange flesh (no peel/pith) into the pot.  Add the sugar and boil for 20 minutes, stirring to dissolve the sugar.


5) Let the Mixture cool a bit, then add to fermentation bucket with airlock.  Add Yeast and stir.


6) Stir everyday with a clean spoon until the yeast has finished working (at least a couple of weeks.)


7) Siphon and put into secondary bottles.

We switched over to siphoning because apparently the cheese cloth method we used to use creates aeration, and that can affect the wine.  Our previous creations tasted fine, but this is supposed to be better.  If you don't have the siphoning equipment, I'm sure straining it with cheese cloth is fine too.  We could have gotten a bit more if we strained the sludge/fruit particles at the bottom, but we decided to try for the best quality that we could.  I read somewhere that this is an 'ugly' wine, I guess that's because it's not a clear wine. I think if it keeps it's yellowy color it's kind of appropriate for the product.


A month (or so) later. This is the settled batch, yeast has done its work.


We stopped siphoning when we got to the sludge area.
A 2 gallon batch yields a little under 1 1/2 gallons apparently. 

8) Wait another 6 months (or so) and put into final bottles.

The recipe recommends waiting a full year before enjoying.  So...  I guess in May 2016 I can update with a review


So that's what we did this time around.  We're a little worried that the citrus will overpower the flavor, but it's in multiple recipes so fingers crossed.

Special thank you to our assistant Jayne,
he hung out with us and provided moral support.


FINAL WHINE:


After 2 days thankfully my nails and fingers are returning to normal colors.


I will be trimming my nails after this, the black went away,
but no scrubbing or soaking has taken all the yellow out completely.

Thank you as always for reading!  
Keep an eye out for our reviews of the final product!

Saturday, February 21, 2015

Even my feet are tired of this weather...Foot Scrub Edition

After a trip to the grocery store with my husband, in the frozen tundra that is upstate New York, during a snow storm that I believe is named Pandora, our dried out feet were the big topic of discussion.  So, I decided to make another batch of foot scrub and soak.  I made some a few weeks ago, and almost blogged it, but I was in fact too lazy to do it! So, this time, I was determined to blog.

First off, my new camera is lost, I assume in the black hole that is my home.  So, I went for my good old Nikon, with the battery latch that refuses to stay closed without layers of tape.  I knew the general area that it was last seen, so after a ten minute search, I finally found it! Of course the camera card, and apparently the ten others kicking around were MIA.  So after 15 minutes of searching I gave up!  Veronica 1, House <4.  Long story short, welcome to the first blog entirely from my Kindle Fire HDX.  Sorry for any typos and poor photo quality!!  (At this point I was too lazy to toggle between laptop and tablet, so I'm rolling with it!)

Now, in a previous post  I did foot scrubs, and sang their praises!  They're still awesome, and easy to make, which is why even when I'm in Lazy Diva mode, I still find the time to whip one up.  If I weren't blogging it would have been a five minute project.
This time around I concocted a recipe that I like to call...

The Lazy Diva's Pretty Much Everything Except the Kitchen Sink Salt Scrub

Ingredients:

Dry:

1/2 cup Epsom salts
1/2 cup sea salt
1 tsp Ground Orange peel
1 tsp Ground Lemon peel
1 tsp dried Calendula petals
1 tsp dried Lavender

Wet:
1/2 cup Coconut oil
1/4 cup Apricot Kernel oil
1/4 cup Sweet Almond oil
1 tbsp Vitamin E
15 drops of Peppermint oil
10 drops of Rosemary Essential oil
10 drops of Lavender Essential oil

Step one:  Add all the dry ingredients.


Step Two:  Add all the rest and stir.


Step Three: Enjoy!
Looks like the instant oatmeal with fruit!  Also, bottom right, that's me !!  Squatting to keep the evil shadow out of the shot and get closer!!  Mostly worked, guess I should have cropped these! lol!

Now I add a few spoonfuls to the warm water and soak, then after a while I take a spoonful and really work it into my feet. I also use it as a shower scrub as I mentioned in the previous blog.  The oils leave a nice layer of softness, but a lotion bar afterwards helps soften and lock in moisture even better!  Great softening combo! Speaking of which, I need to make another batch of those too!  (My recipe doesn't really change for those, so no use revisiting that until I find a new variant I like more.  If it's not broke...)

Big Note:  If your feet are actually splitting open, salt may not be your friend.  My rough sand paper feeling feet enjoyed the salt soak.  Hubby's cracked feet felt a slight salt sting.  If that's the case, and it's too much, you can substitute some sugar for the salts or do just the oils and the cotton sock treatment or wrap them in plastic wrap for a bit.

Thanks for reading!!!