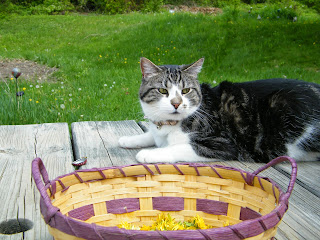
My husband has had many more projects than I have lately, he's also had a lot more time. I would like to think that if I had more free time I'd do more, but really, I probably wouldn't. Anyway, one of his newer hobbies has been wine making. I've been meaning to blog some of this, but he usually works on it when I'm not around. He's slowly getting all the equipment and such, and is toying with the idea of eventually opening a Winery. Time will tell on that one!
This past week hubby decided to put off mowing the lawn and harvest the bounty that the Dandelion fairies had inundated us with. Neither of us have ever had Dandelion wine, but we decided to give it a try and see for ourselves. We spent almost five hours in the sun picking and separating the dandelion petals. We wanted to do a 2 gallon batch, so we needed at least 12 cups of petals from the recipes we saw. When we started I had no idea that it would take so darn long! I applied 30 spf sunblock twice, and still ended up with a burn all over my back and shoulders! So now I whine, whine, whine, about making this wine! (Hubby's arms got burned, but he's a man, so he doesn't whine about it, too much.)
Deciding what recipe to use was a tough decision. Since I was blogging this, he left it more up to me, but after 5 hours in the sun I didn't want to make any big decisions. So we did this quick mish-mash of recipes. This may be our first and last foray into Dandelion Wine. This was experimental, so I'll write a review in six months to a year and let everyone know what the consensus was on the recipe.
Here's what we did.
Dandelion Wine Experiment 1
Ingredients:
12 cups of Dandelion petals (try to remove all green pieces to avoid bitterness)
2 Gallons of Water
6 Cups of Sugar
2 Oranges (Zest and Fruit (peel the slices out, no pith))
2 Lemons (1 lemon's Zest and Juice from both)
1 packet Champagne Yeast
YIELD: About 2 Gallons
1) Pick the Dandelions, and separate so you have at least 12 cups of petals.
2) Bring water to a boil, and pour over (or add) petals and stir. Then place Cheese Cloth over and let steep for at least 3 hours (some recipes say up to 3 days).
3) Strain the petals out of the liquid using cheese cloth (and a strainer). Give a final squeeze to the petals to make sure you get as much flavor out as you can.
4) Take the dandelion liquid, and zest 1 lemon, and 2 oranges into it. Then juice the two lemons into the pot, we did it over a strainer to avoid the seeds (discard the lemons). Peel the oranges, then cut up and place the orange flesh (no peel/pith) into the pot. Add the sugar and boil for 20 minutes, stirring to dissolve the sugar.


5) Let the Mixture cool a bit, then add to fermentation bucket with airlock. Add Yeast and stir.
6) Stir everyday with a clean spoon until the yeast has finished working (at least a couple of weeks.)
7) Siphon and put into secondary bottles.
We switched over to siphoning because apparently the cheese cloth method we used to use creates aeration, and that can affect the wine. Our previous creations tasted fine, but this is supposed to be better. If you don't have the siphoning equipment, I'm sure straining it with cheese cloth is fine too. We could have gotten a bit more if we strained the sludge/fruit particles at the bottom, but we decided to try for the best quality that we could. I read somewhere that this is an 'ugly' wine, I guess that's because it's not a clear wine. I think if it keeps it's yellowy color it's kind of appropriate for the product.
 |
| A month (or so) later. This is the settled batch, yeast has done its work. |
 |
| We stopped siphoning when we got to the sludge area. |
 |
| A 2 gallon batch yields a little under 1 1/2 gallons apparently. |
The recipe recommends waiting a full year before enjoying. So... I guess in May 2016 I can update with a review
So that's what we did this time around. We're a little worried that the citrus will overpower the flavor, but it's in multiple recipes so fingers crossed.
Special thank you to our assistant Jayne,
he hung out with us and provided moral support.
FINAL WHINE:
After 2 days thankfully my nails and fingers are returning to normal colors.
 |
| I will be trimming my nails after this, the black went away, but no scrubbing or soaking has taken all the yellow out completely. |
Thank you as always for reading!
Keep an eye out for our reviews of the final product!


No comments:
Post a Comment